

Introduction
Tracheostomy care is an important nursing responsibility that helps maintain a clear airway, manage secretions, protect the skin around the stoma, and identify complications early. Because patients, tracheostomy tubes, and care settings differ, there is no single procedure that applies to every situation. Nurses and nursing students should always follow the patient’s care plan, the tube manufacturer’s instructions, and their facility’s current clinical policy.
This guide reviews the key trach care steps and explains the purpose behind each part of the procedure. It is intended for nursing education and skills training rather than as a substitute for supervised clinical instruction.
What Is Trach Care?
Trach care is a commonly used abbreviation for tracheostomy care. It refers to the assessment and routine care of a patient who has a surgically created opening through the neck into the trachea.
The required tracheostomy care steps depend on the patient’s condition, the type of tube, and the clinical setting. Care may include:
- Assessing the airway, breathing, and tracheostomy site
- Cleaning the stoma and surrounding skin
- Changing the tracheostomy dressing
- Cleaning or replacing the inner cannula
- Checking the tracheostomy ties or tube holder
- Managing respiratory secretions
- Performing suctioning when clinically indicated
- Checking whether adequate airway humidification is being provided
Tracheostomy care is not limited to cleaning the stoma. It also involves ongoing airway assessment and early recognition of problems such as tube obstruction, displacement, bleeding, infection, and skin breakdown.
Why Is Tracheostomy Care Important?
A tracheostomy bypasses the nose and part of the upper airway. As a result, inhaled air does not receive the same natural warming, filtering, and humidification that normally occurs before it reaches the lower respiratory tract.
Secretions may become thick or dry and can collect inside the tracheostomy tube. The skin around the stoma may also be exposed to moisture, mucus, pressure, and movement from the tube.
Appropriate tracheostomy care helps to:
- Maintain a clear and patent airway
- Monitor and manage respiratory secretions
- Reduce the risk of tube blockage
- Protect the stoma and surrounding skin
- Reduce contamination around the tracheostomy site
- Keep the tube properly positioned and secured
- Identify bleeding, infection, displacement, or respiratory deterioration early
The National Tracheostomy Safety Project identifies tube cleaning, appropriate humidification, secretion management, and suctioning when required as important elements of basic tracheostomy care.
Supplies Needed for Trach Care
The equipment required for a trach care procedure depends on the type of tube, whether the inner cannula is disposable or reusable, the condition of the stoma, and the healthcare facility’s protocol.
Common supplies may include:
- Gloves and appropriate personal protective equipment
- Tracheostomy care kit
- Sterile saline or a facility-approved cleaning solution
- Sterile gauze
- Pre-cut V-slit tracheostomy dressing
- Cotton-tipped applicators, if permitted by facility policy
- Clean or replacement inner cannula, if applicable
- Tracheostomy ties or tube holder
- Suction equipment and an appropriately sized catheter, if required
- Humidification equipment, if prescribed
- Waste bag
Emergency airway equipment should also be available in accordance with the patient’s care plan and facility policy. The required equipment may include a spare tracheostomy tube of the same size, a smaller tube, an obturator, oxygen-delivery equipment, and a manual resuscitation device.
Before beginning, confirm the patient’s identity, explain the procedure, perform hand hygiene, apply the required PPE, position the patient appropriately, and organize the supplies within reach. Standard, clean, aseptic, or sterile technique should be used according to the procedure being performed and local policy.
Key Trach Care Steps
The following sequence provides a general framework. The order may vary according to the patient’s needs, the tube design, and institutional guidelines.
Step 1: Assess the Patient and Tracheostomy
Begin by assessing the patient rather than immediately focusing on the equipment. Observe the patient’s breathing pattern, respiratory effort, comfort, skin color, oxygen saturation when monitored, and ability to cough or clear secretions.
Assess the tracheostomy for:
- Correct tube position
- Secure connections and tube ties
- Visible, audible, thick, or unusually colored secretions
- Blood or unexpected drainage
- Redness, swelling, odor, or skin breakdown
- Signs of tube obstruction or displacement
- Changes in breath sounds or airflow
This assessment helps determine what care is required. For example, visible secretions alone do not automatically mean deep suctioning is necessary if the patient can cough effectively and maintain a clear airway.
Any sudden respiratory distress, inability to pass a suction catheter, significant bleeding, suspected tube displacement, or rapid deterioration requires immediate action according to the facility’s emergency airway protocol.
Step 2: Perform Suctioning If Indicated
Tracheostomy suctioning should be performed in response to clinical assessment, not automatically as part of every scheduled trach care session.
Possible indications include:
- Visible or audible secretions
- Coarse or changing breath sounds
- An ineffective cough
- Increased work of breathing
- Decreasing oxygen saturation
- Suspected secretion-related tube obstruction
- Changes in ventilation measurements in a mechanically ventilated patient
If suctioning is needed, use the catheter size, suction setting, insertion method, and oxygenation strategy specified by the patient’s care plan and facility policy. Monitor the patient throughout the procedure and stop if significant distress or deterioration occurs.
Suctioning can cause airway trauma, oxygen desaturation, changes in heart rate, and other complications when performed incorrectly or unnecessarily. Current guidance therefore supports an assessment-based approach. For specific guidance, please refer to the AARC Clinical Practice Guidelines.
Step 3: Remove the Used Dressing
Stabilize the tracheostomy tube as needed and carefully remove the used dressing without pulling on the tube or disturbing its position.
Observe the dressing for:
- Amount and color of drainage
- Mucus or thick secretions
- Blood
- Odor
- Excess moisture
Dispose of the dressing according to infection-control policy and change gloves if they have become contaminated.
Avoid cutting ordinary gauze to fit around the tracheostomy tube. Loose fibers from cut gauze may enter the stoma or airway. Use a purpose-made, pre-cut tracheostomy dressing when a dressing is indicated.
Step 4: Clean the Stoma and Surrounding Skin
Inspect the stoma before cleaning. Note redness, swelling, tenderness, bleeding, discharge, excess granulation tissue, pressure injury, or widening of the opening.
Clean the stoma and surrounding skin with sterile saline or another solution approved by the facility and manufacturer. Work gently and avoid unnecessary movement of the tube. Use a new section of gauze or a new applicator for each pass to avoid moving secretions back toward the stoma.
Remove dried secretions without forceful scraping. After cleaning, dry the skin carefully because trapped moisture can contribute to irritation and skin breakdown.
Cleaning products and techniques vary between institutions. Solutions that can irritate tissue should not be used unless specifically directed by the facility’s policy or manufacturer’s instructions.
Step 5: Clean or Replace the Inner Cannula
Not every tracheostomy tube has a removable inner cannula. Before performing this step, confirm the tube design and whether the cannula is disposable or reusable.
For a disposable inner cannula, remove and discard it according to the manufacturer’s instructions, then insert the correct replacement.
For a reusable inner cannula, remove it using the appropriate technique, inspect it for secretions, and clean it using the approved solution and method. Rinse and dry it as required before reinsertion. Confirm that the cannula is properly locked or secured in place.
Do not use an improvised cleaning solution or method. Inner cannula care should follow the tube manufacturer’s guidance and local protocol because materials and designs differ.
Step 6: Apply a New Tracheostomy Dressing
Once the skin is clean and dry, place a clean, pre-cut tracheostomy dressing beneath the tube flange if the patient’s care plan requires one.
The dressing should lie flat without creating excessive pressure. Avoid layering unnecessary gauze under the flange, as excessive material can affect tube position and retain moisture.
Some established, dry stomas may not require a dressing. Follow the patient’s care plan and facility policy rather than assuming a dressing is always necessary.
Step 7: Check the Tracheostomy Ties
Check that the tracheostomy ties or holder are clean, secure, and appropriately fitted. They should stabilize the tube without causing excessive pressure, discomfort, or skin injury.
Inspect the neck beneath and around the ties for:
- Redness
- Moisture
- Pressure marks
- Skin breakdown
- Swelling
Changing the ties can increase the risk of accidental decannulation, particularly when the stoma is new or the patient is considered high risk. Follow local policy regarding stabilization of the tube and whether a second trained person is required. Do not remove the existing ties until the tube can be kept safely in position.
Step 8: Check Humidification Needs
Because a tracheostomy bypasses the natural humidifying function of the upper airway, the patient may require an artificial source of humidification. The appropriate method depends on factors such as the patient’s condition, oxygen requirements, ventilation, secretion consistency, and prescribed respiratory support.
Check that the prescribed humidification equipment is:
- Present and functioning correctly
- Properly connected
- Clean and maintained according to policy
- Appropriate for the patient’s current respiratory needs
Inadequate humidification can cause secretions to become thick and difficult to clear, increasing the risk of crusting and tube obstruction. For more guidance, please refer to the AARC Clinical Practice Guidelines.
Humidification is usually part of ongoing airway management rather than a task performed only during a dressing change.
Step 9: Reassess and Document
After completing care, reassess the patient’s respiratory status, comfort, airway patency, tube position, stoma, dressing, ties, and oxygen saturation when applicable.
Documentation should follow facility requirements and may include:
- Condition of the stoma and surrounding skin
- Type, amount, color, and consistency of secretions
- Whether suctioning was performed and the patient’s response
- Inner cannula care or replacement
- Dressing and tie changes
- Humidification equipment in use
- Any abnormal findings or complications
- Actions taken and people notified
The procedure is not complete until the patient has been reassessed and relevant findings have been recorded and communicated.
Practicing Trach Care in Nursing Training
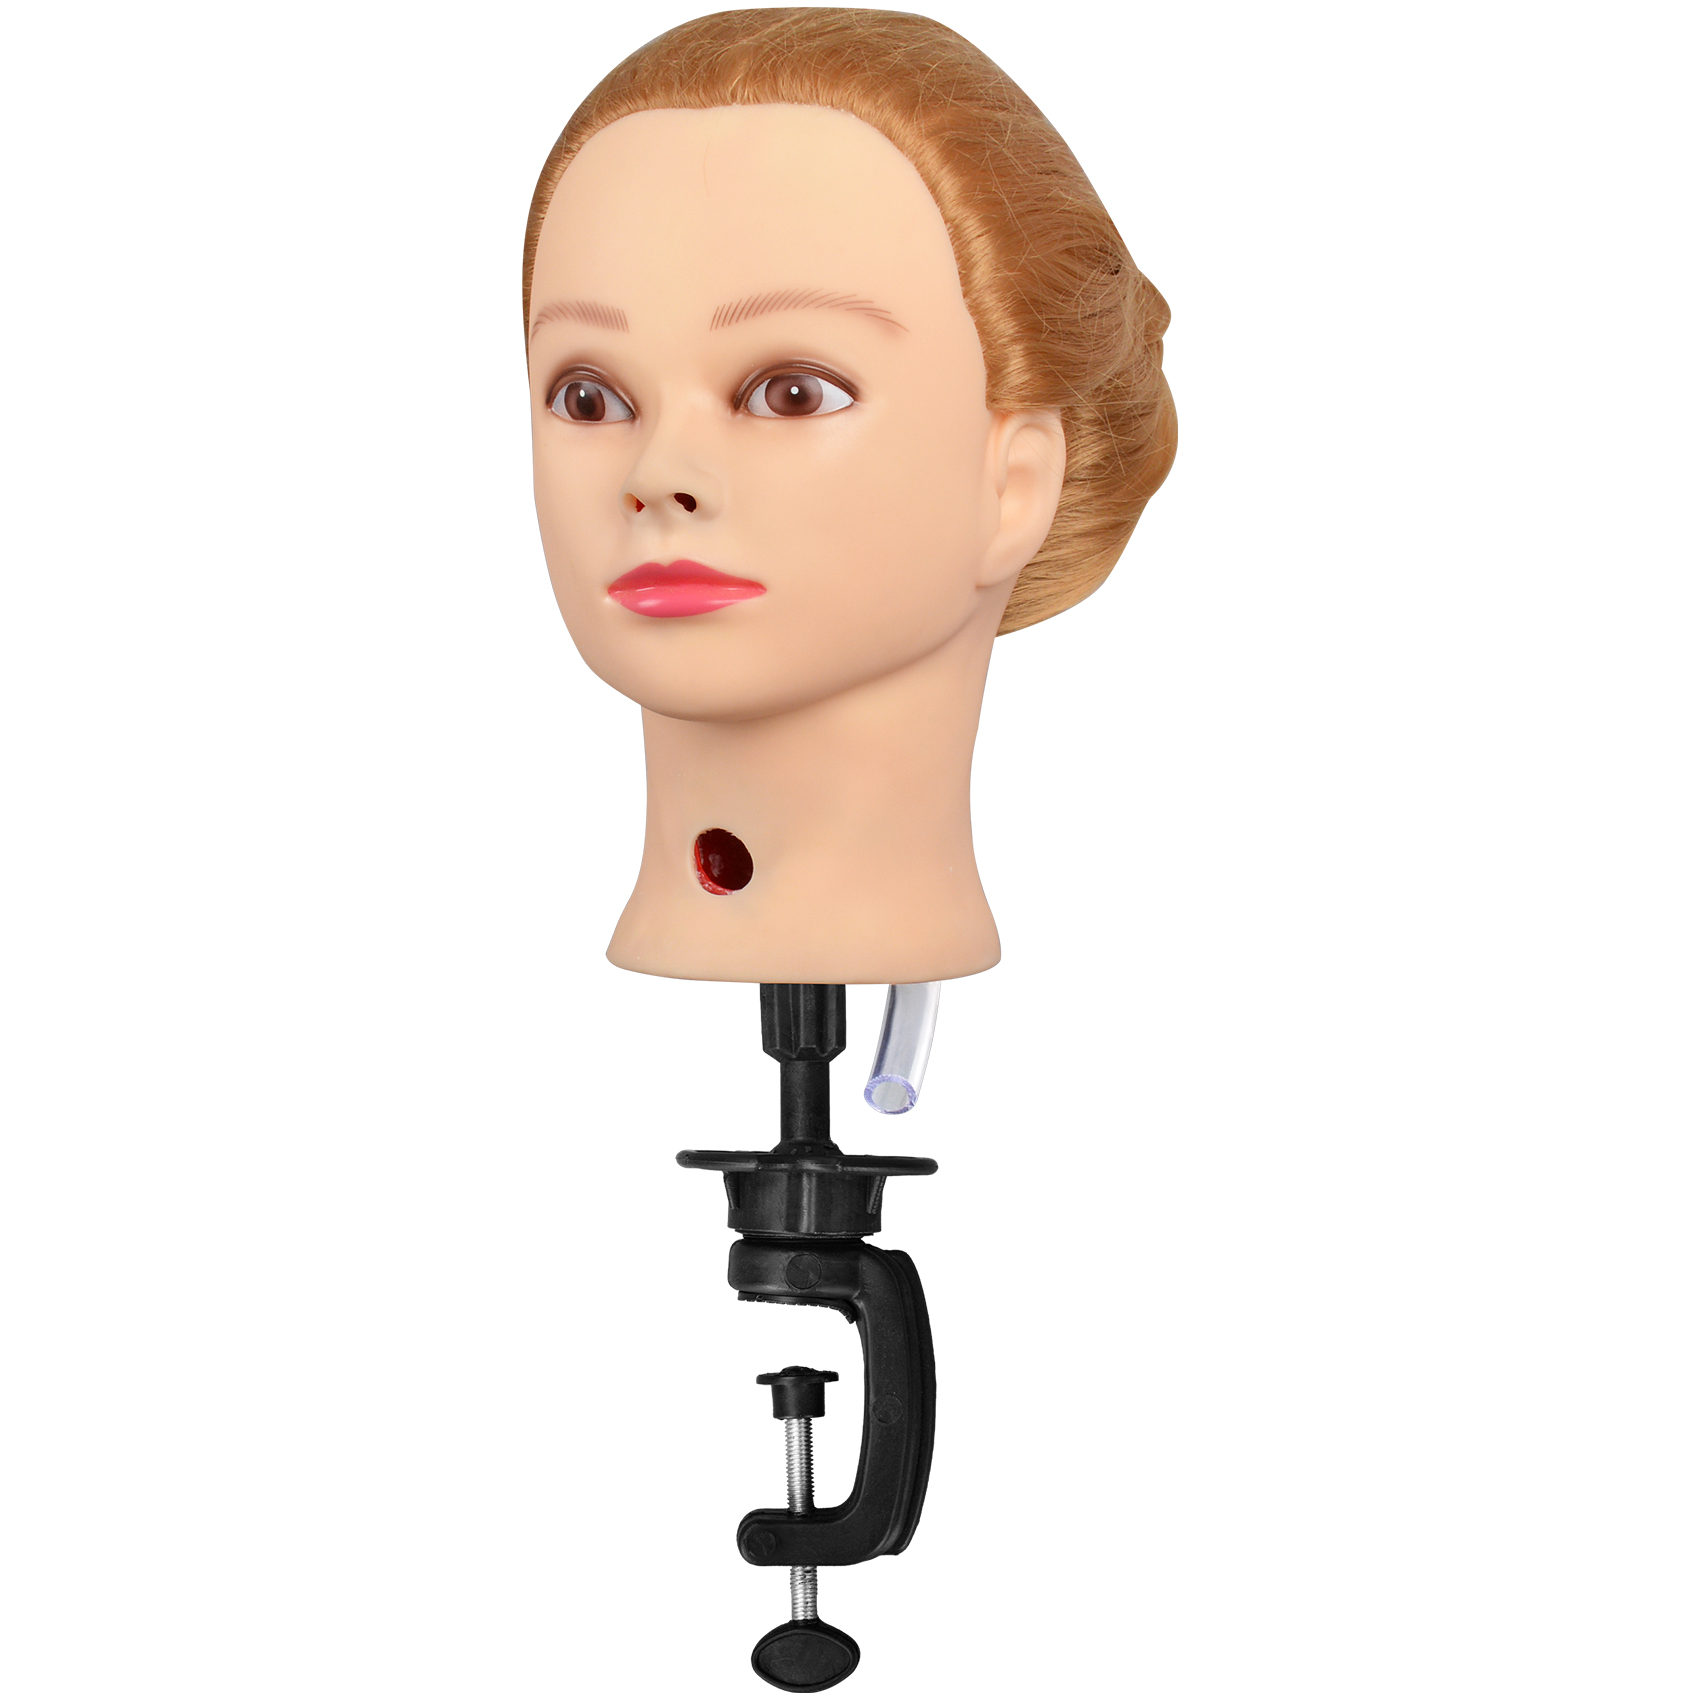
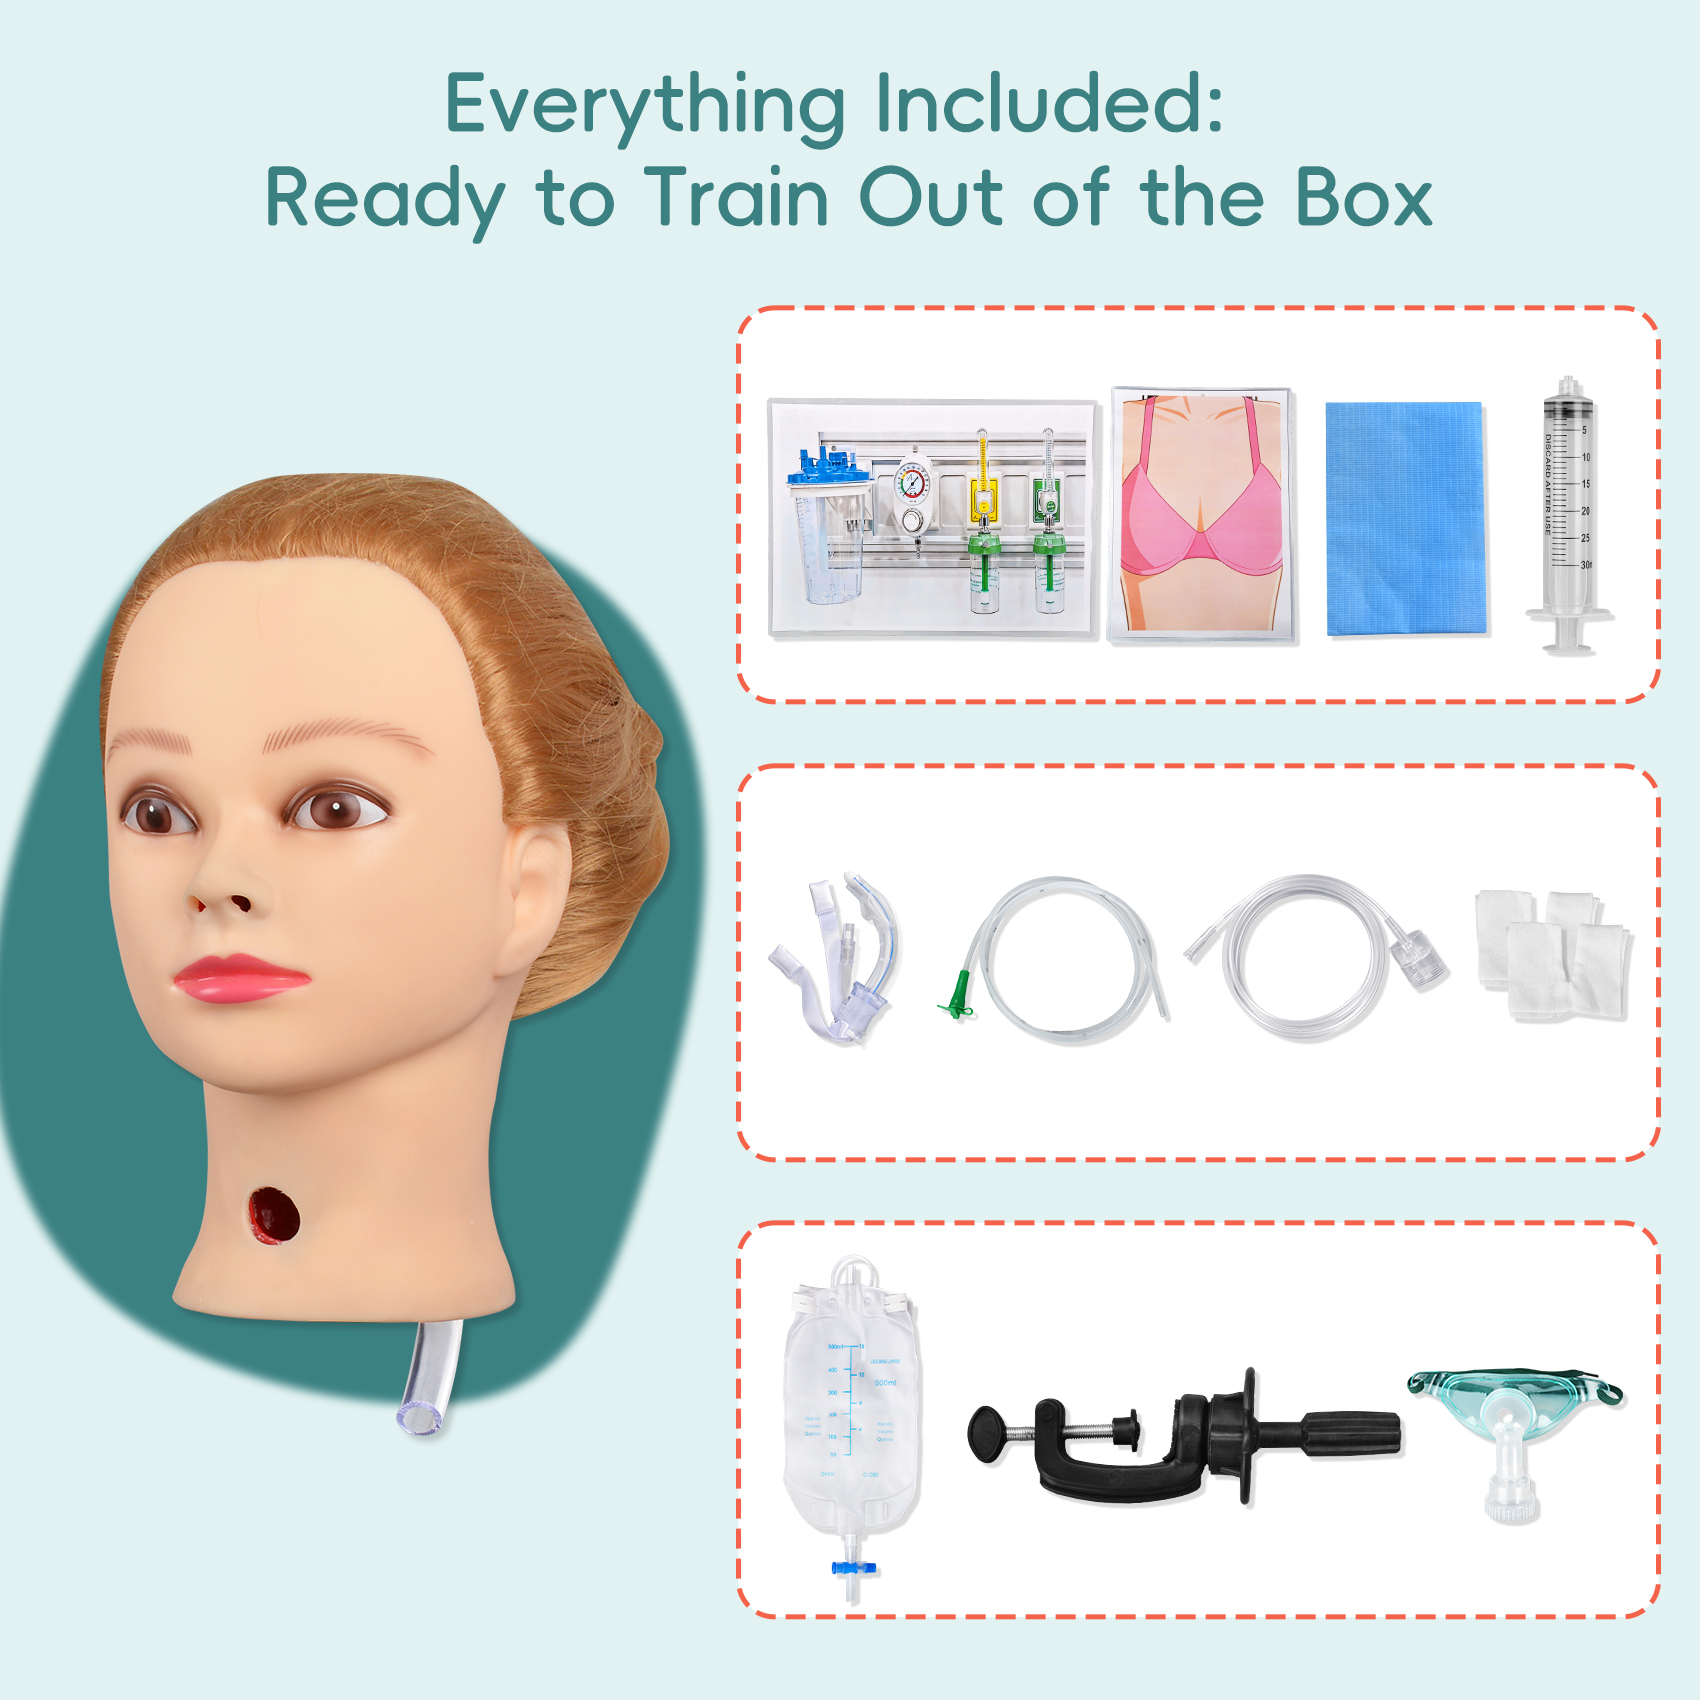
The steps in tracheostomy care involve several coordinated skills that can be difficult to learn through reading or observation alone. A tracheostomy care training manikin allows nursing students to become familiar with the equipment, practice an organized sequence, and receive feedback before working with patients.
Practicing the complete tracheostomy care steps on a simulator can help learners understand how individual tasks fit together. The Female NG Tube & Trach Care Simulator supports tracheostomy care, inner cannula maintenance, airway humidification, and suctioning practice.
Simulation should reproduce the facility’s approved procedure as closely as possible. Students should understand not only how to perform each action, but also when an intervention is indicated, which findings should be reported, and when assistance must be requested.
Conclusion
Caring for a patient with a tracheostomy can feel intimidating at first, especially when every movement around the airway seems important. That uncertainty is normal for nursing students and healthcare trainees who are still becoming familiar with tracheostomy equipment and procedures.
Confidence develops through preparation, repeated practice, and constructive feedback—not by trying to memorize every action at once. Take time to understand the purpose behind each key trach care steps, practice in a safe simulation environment, and ask for guidance whenever you are unsure. With supervised experience, trach care can gradually become a more organized and manageable part of your nursing practice.